Real-Time Features with Action Cable in Ruby on Rails
- By: Shriffle

Action Cable is a feature introduced in Rails 5 that allows you to create pub/sub WebSocket connections in your Rails application. It upgrades the standard HTTP connection between the server and client to a WebSocket, enabling real-time, bi-directional communication.
With Action Cable, you can achieve several benefits:
- Real-time Updates: WebSocket connections provide live updates to your user experience without the need for manual page refreshing.
- Reduced Data Transfer: WebSockets minimize data transferred per transmission by removing unnecessary header/packet data, improving scalability.
- Server-side Push: The server can proactively push updates to clients without waiting for client requests, resulting in a more engaging user experience.
Action Cable introduces some key terminology:
- Cable: Represents the WebSocket connection, serving as the single conduit for all data transmission across channels.
- Channel: A named entity that defines behavior and contains both server and client methods. Clients can subscribe to channels and communicate with the server via custom data handling code. Server-side implementation logic for subscriptions resides here.
- Connection: The server-side logic responsible for managing subscription actions initiated by the client's browser.
- Subscription: When a client initiates a "create subscription" event, it becomes part of a list of subscribers for a specific channel. The server publishes data to all subscribers of the corresponding channel. Client-side implementation logic for the named channel subscription resides here.
In summary, Action Cable is a powerful addition to Rails that integrates WebSockets into your application, enabling real-time features such as server-side triggered updates and multi-user interaction. By understanding the basic concepts of cables, channels, connections, and subscriptions, you can leverage the full potential of Action Cable to enhance your application's user experience.
To implement real-time chat functionality in your Rails application using Action Cable, follow these steps:
1. Setting up the Router:
- In the `config/routes.rb` file, add the following line to mount the Action Cable server: `mount ActionCable.server => '/cable'`.
2. Browser Connection:
- Create a file named `cable.js` in the `app/assets/javascripts` directory.
- Add the following code to establish a connection with the Action Cable server:
   //= require action_cable
   //= require_self
   //= require_tree ./channels
   (function() {
    this.App || (this.App = {});
    App.cable = ActionCable.createConsumer("/cable");
   }).call(this);
3. Server-side Connection Logic:
- Create a file named `connection.rb` in the `app/channels/application_cable` directory.
- Add the following code to handle the connection logic when a user's browser subscribes to a channel:
   module ApplicationCable
    class Connection < ActionCable::Connection::Base
     identified_by :current_user

     def connect
      self.current_user = find_verified_user
     end

     protected

     def find_verified_user
      if current_user = User.find_by(id: cookies.signed[:user_id])
       current_user
      else
       reject_unauthorized_connection
      end
     end
    end
   end
4. Application Channel:
- Create a file named `channel.rb` in the `app/channels/application_cable` directory.
- This file serves as the base class for all channels and allows you to define common methods that can be used across channels.
5. Chat Channel:
- Create a file named `chat_channel.rb` in the `app/channels` directory.
- Add the following code to define the behaviour of the chat channel:
   class ChatChannel < ApplicationCable::Channel
    def subscribed
     stream_from specific_channel
    end

    def receive(data)
     ActionCable.server.broadcast \
      specific_channel, format_response(data)
    end

    private

    def specific_channel
     "chat_#{params[:room]}"
    end

    def filter(msg)
     msg.to_s[0...140]
    end

    def format_response(data)
     {
      message: filter(data["message"]),
      username: current_user.username
     }
    end
   end
6. Client-side Subscription Logic:
- Create a file named `chat_lobby.coffee` (or `chat_lobby.js`) in the `app/assets/javascripts/cable/subscriptions` directory.
- Add the following code to handle the subscription to the ChatChannel and process received data:
   App.chatChannel = App.cable.subscriptions.create(
    { channel: "ChatChannel", room: "Lobby" },
    {
     received: function(data) {
      this.appendLine(data);
      $('#chat-feed').stop().animate({ scrollTop: $('#chat-feed')[0].scrollHeight }, 800);
     },

     appendLine: function(data) {
      var html = this.createLine(data);
      $("[data-chatroom='Lobby']").append(html);
     },

     createLine: function(data) {
      return `
       <article class="chat-line">
        <span class="speaker">${data["username"]} :</span>
        <span class="body">${data["message"]}</span>
       </article>
      `;
     }
    }
   );

   $(document).on('keypress', 'input.chat-input', (event) ->
  if event.keyCode is 13
    App.chatChannel.send
      message: event.target.value
      room: 'Lobby'
    event.target.value = ''
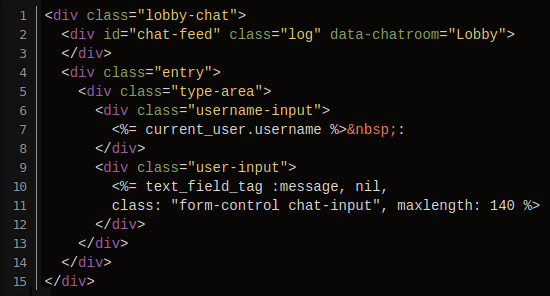
Then there is the view that has the input and contains the content for the chat.
With this, you should have a fully working chatroom to test out (assuming you've already implemented the controllers, views, and user model with devise).
This implementation is stateless as is. Any time the user refreshes or changes pages, all previous chat information is lost. To persist state, you'll need to integrate something like Redis. Of course, having the chatroom be stateless could be considered a "feature," since you may only need to see conversations while you're there.
Shared Channel Helper
In the `app/channels/application_cable/channel.rb` file, you can leverage the shared channel helpers to simplify your code and make it more reusable. Instead of the specific `specific_channel` method mentioned earlier, you can add the following `stream_channel` method:
def stream_channel
 "#{channel_name}_#{params['room'] || 'main'}"
end
Perform and Partial Content Reloading
The `channel_name` method is provided by Action Cable and returns a rough version of the channel class name. For example, `FooChats::BarAppearancesChannel.channel_name` would evaluate to `'foo_chats:bar_appearances'`. The `params['room'] || 'main'` part ensures that a room name is used if available in the parameters, otherwise it defaults to `'main'`. This method is flexible and can be used in any channel implementation.
By using the `stream_channel` method, you can simplify your code by consistently using it for both `stream_from` and `broadcast` operations. This abstraction removes the need to handle params directly within your channel methods, making your code more clean and maintainable.
When considering partial content reloading in ActionCable, it's important to assess the trade-offs and determine the most suitable approach based on your specific use case. One option is to render and broadcast HTML partials from the server using `ApplicationController.render`. This allows you to send pre-rendered HTML to subscribed users, which can then be appended to the appropriate section of the page. However, it's worth noting that this approach may have scalability implications if you're broadcasting the same content to multiple users.
Another alternative is to directly broadcast JavaScript code to the clients and execute it upon receiving it. This can be achieved by including a `received` callback in your client-side CoffeeScript code and evaluating the JavaScript code included in the `data` object. However, using this approach should be carefully considered, as executing arbitrary JavaScript code received from the server may introduce security risks and potential vulnerabilities.
For a more performant website, a recommended practice is to preload templates on the client-side and dynamically render data as it arrives. This can be achieved by deferring the retrieval of templates until after the page has fully loaded, ensuring a smooth user experience. By combining this approach with ActionCable, you can update the content efficiently as new data arrives without the need to reload the entire page.
If you only need to update content for individual users after a specific action is taken, leveraging Unobtrusive JavaScript (UJS) can be a suitable choice. UJS allows you to update content on the client-side without requiring explicit user interaction. On the other hand, if you need to update content without any action from the user, ActionCable is a more appropriate tool for real-time updates.
In addition, ActionCable provides the `@perform` method in CoffeeScript, which allows you to directly call Ruby methods defined in your channel's code. By using `@perform`, you can invoke a specific Ruby method from your CoffeeScript code and pass any necessary parameters. This enables seamless communication between the client and server, allowing you to execute server-side logic in response to client events.
Ultimately, the choice of approach depends on your specific requirements, scalability considerations, and the desired user experience.
Help From Browser
In order to inspect WebSocket connections in the Google Chrome browser, you can use the built-in WebSocket inspection feature. Here's a step-by-step guide:
1. Open the Chrome Developer Tools by pressing Ctrl+Shift+I (or right-clicking on the page and selecting "Inspect").
2. Navigate to the "Network" tab.
3. Click on the "WS" (WebSocket) sub-tab.
4. Reload the page using F5 to establish the WebSocket connection.
5. On the left side, you will see the WebSocket Cable connection.
6. Click on the Cable connection to reveal four tabs: Headers, Frames, Cookies, and Timing.
7. Click on the "Frames" tab to view the communications happening over the WebSocket connection.
8. You can now observe the messages being sent and received in the chat by interacting with the page.
For Firefox, you can install the WebSocket Monitor add-on to inspect WebSocket connections. This add-on provides a comprehensive toolset for monitoring WebSocket communications. It features a conversation mode that organizes the messages exchanged in a chat-like interface, making it easy to follow the conversation. It is a highly recommended tool for WebSocket debugging in Firefox.
Conclusion
In summary, this blog post aimed to provide a clear understanding of the ActionCable basics, focusing on essential terminology and concepts. By grasping these fundamentals, you can better comprehend the purpose and placement of various components within ActionCable. It's important to refer to reliable sources and the official documentation to avoid outdated or inaccurate information.
Moreover, it's worth highlighting that ActionCable is a versatile tool that can be used for a wide range of applications. While the setup process is not extensively covered in this blog post, the intention was to showcase the practical usage of ActionCable and inspire readers to explore its potential for innovative solutions.

1 Comments